Copy and paste the template above into a text editor (Bluefish or Notepad or whichever is your favourite).
Write an HTML document about your family, or what you did in the summer holidays, or your best friend or your hobbies.
Watch this video if you need more help.
HTML Editors
If you use an editor which knows about it may make things easier for you. These editors help you to write
correct HTML and give you hints about what to do next. Some people find Bluefish
quite useful for this. You can install Bluefish on your computer. Here is a list of HTML editors that you can choose from.
Try some of these out.
The Structure of an HTML Document
An HTML document is made up of elements.
Elements
Normal Elements : These elements can contain other elements.
Text Elements : These elements do not contain other elements. They are just text.
Void Elements : These elements do not contain other elements. They contain nothing. For example IMG .
The bits in angled brackets < and > are called tags . When we write elements, all except the void elements have a
start tag
and an
end tag
.
The html code, above, has an HTML element
which starts with the start tag:
<HTML>
and ends with the end tag:
</HTML>
The HTML element, above has two children:
A HEAD element.
A BODY element.
Again, we see the HEAD element
which starts with the start tag:
<HEAD>
and ends with the end tag:
</HEAD>
and
the BODY element
which starts with the start tag:
<BODY>
and ends with the end tag:
</BODY>
Continuing, further, the HEAD element, above, has four children,
a META element, followed by a TITLE element
and then two more META elements.
Then BODY element has three children:
an H1 element, follwed by an H2 element
and finally an article element.
How many children does the article element in this example have?
META elements are examples of
Void Elements : These elements do not contain other elements. They contain nothing. Since META elements contain nothing they do not have an end tag.
Element Attributes
Some elements are written like this:
<meta name="author" content="Seb">
Inside the start tag for elements we can have lists of attributes each of which can have a value.
This meta element above has two attributes: name and content
which have the values "author" and "Seb" respectively.
Another example of an element with attributes is the A element that is used for links (we will explore this later).
<a href="http://www.google.co.uk">click here</a>
This one has one attribute href with value "http://www.google.co.uk".
The HTML Document Tree
The HTML above gives rise to the following strucure:
This structure is called the document tree.
Trees have a root which is the element at the top and a (possibly empty) list of children.
Each child itself is a tree.
Notice, we have not included the attributes in the tree.
Trees are very important in computer science.
If you would like to read more aout trees please see
here.
You can check your HTML for valid syntax here.
Always check your HTML code before completing it.
Use the HTML validator at http://validator.w3.org/check to check the syntax of the HTML code you wrote earlier. If there are errors correct them all.
Adding Images (Pictures) to your Web Pages
To add images to a web page we use the IMG element. This is an example of a void element. It does not need
an end tag since it doesn't have any children. Here is an example:
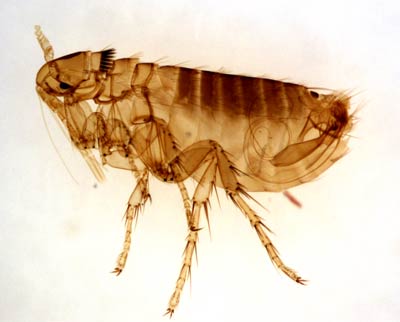
<img src="images/flea-1.jpg">
This displays:
assuming you have got an image called flea-1.jpg in the images sub-directory (folder) of the directory containing your HTML document.
If you don't have the image in the right place you will see:
which means your browser cannot find the image.
You can also display images that exist somewhere else on the Web. For example
We have added a width attribute to this IMG element and given it the value 100.
Add some images either from your own camera or from the Web to your HTML document. Experiment with different widths.
Here is more of an explanation of the IMG
element. Experiment with all the other (non-deprecated) attributes to display your images differently.
If you don't know already, find out what deprecated means.
Use the site http://www.w3schools.com. It is an incredibly valuable resource if you are
new to creating web pages.
Making your Website public
In order to make your website public, you need to store it on a computer that is connected to the internet and is also running a webserver (for example Apache). An example of such an computer is igor. Computers like igor have an IP address and a domain name which distinguishes them
from all other computer in the world. The ip address for igor is 158.223.1.108 and its domain name is
igor.gold.ac.uk. The same computer can be associated with many domain names. Another domain name for igor is
www.doc.gold.ac.uk ('doc' stands for Department of Computing).
Watch this video which tells you how to make a website on igor.
Choice of Operating System
The operating system is what you 'see' when you switch on your computer. It is the software that controls the hardware of your computer and it acts as an interface between the user this hardware. There are three main operating systems in use today:
Microsoft Windows is the most popular operating system to run personal computers. Unix, however, is the most used operating system for computers which run web servers like igor. If you create web pages on your own computer you will have to copy them to igor in order to make them public. To copy files from a Windows computer to igor you will need some special software, for example
WinSCP. Install it on your own computer. If you are working from a Lab computer in Goldsmtihs igor is mapped to the G: drive.
Password Protecting Directories of your Web Space
Watch this video to see how to password protect your website.
During the course, you will be preparing your work and placing it on your web site. One problem with this, is because web sites are public, other students can easily copy your work. To prevent this, you need to password protect your website while the course is running.
After the course is finished, you can, of course, remove the password protection.
In order to password protect a directory in your web space you need to put two files in the directory you are protecting.
These two files are called .htaccess and .htpasswd.
In order to create the .htpassword file you must use an htpassword generator like
htaccesstools .
Try this . Study the source code and adapt it to hold your own photos. Put these photos on your website.
Play around with the style sheets. Can you see this page on your mobile phone?
Try this . Study the source code and adapt it to hold your own photos. Put these photos on your website.
Play around with the style sheets. Can you see this page on your mobile phone?
To do anything interesting in a web page (meaningful interaction for example) we need take input in from
a user and process it. Below, I show different kinds of input,
some which work (ansd some which don't) wiith different browsers.
I have included a simple bit of javascript with each one which displays the
value of each input.
Type someing in here and when you press enter or click the mouse outside the box one more than the input appears in the result above.
Notice we have used the parseInt function.
You can read about it here .
Change it so that there is another button called "bing". When you click on bing it alerts "goodbye".
<script type="text/javascript">
function displaymessage()
{
alert("Hello World!");
}
</script>

<input type="button" value="Click me again!" onclick="displaymessage()"/>
This example is very important because it shows how to define and the call a function. Understanding this is crucial in programming.
Rewrite all the previous examples to use functions.
<p>
<input id="Number1">
</p>


<p>
<input id="Number2">
</p>

<p>
<input type="button" value="Add up the two numbers!"
onclick="alert(document.getElementById('Number1').value + document.getElementById('Number2').value)"/>
</p>
Try the above. It doesn't quite work. Correct it!
Noice the use of the document.getElementById()
and its .value attribute. These are very useful.
Rewrite the above example so it uses an output element like 'result'
instead of an alert. Like this:
Result:
Your button code must be this:
<input type="button" value="Add up the two numbers!" onclick="addUpNumbers()"/>
So you must write your own addUpNumbers() function.
Prompts
<script type="text/javascript">
function addTwo()
{
var x= prompt("enter first");
var y= prompt("enter second");
var z = parseInt(x)+parseInt(y);
alert(x + "+" + y + "=" +  z);
}
</script>


<input type="button" value="Add up the two numbers!"
onclick="addTwo()"/>
Courseworks
Your coursework should consist of one web page which
shows the three programs you have written.
It should be aimed at running
in a recent version of the Google Chrome browser.
For each program you should contain the source coede (HTML and Javascript)
both in human readable and executable form. You should also include documentation explaining how each program works.
You must put you coursework in a password protected directory
called CSSpectrumCoursework directly below your public_html directory on igor
in a file called index.html. Please enter the details about your coursework
here.
Marking Scheme
Assignment one
Functionality 10 marks
Clarity of code 4 marks
Documentation 4 marks
Assignment Two
Functionality 10 marks
Clarity of code (e.g. use of methods) 4 marks
Error handling 4 marks
Documentation 8 marks
Assignment Three
Functionality 10 marks
Clarity of code (e.g. use of methods) 4 marks
Extra `creative' features 10 marks
Documentation 8 marks
Coursework page
Ease of use and navigability 10 marks
Extra 'creative features' including use of CSS 10 marks
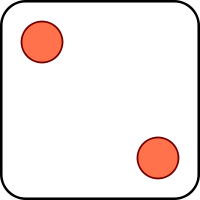
Write a web page where the user inputs their date of birth and the web page displays the user's age in years. You should prevent illegal date input.
This program will need to use today's date.
Write a web page which emulates throwing a dice. You will need 6 images of each face of the dice and you also need to work
out houw to generate random numbers between 0 and 5 in Javascript.
The deadline for the coursework is 5pm on Dec 15th. 2011.
If you are doing this as a resit, the deadline is 5pm on Aug 21st 2012. Please email me a link to your work before the deadline.